
Main Courses
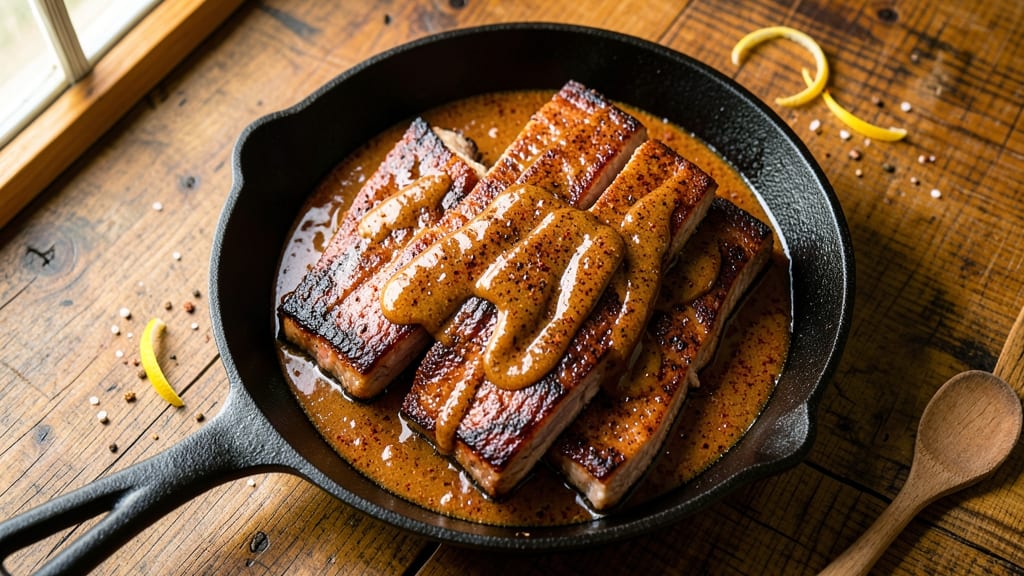
This apple butter ribs recipe transforms tough cuts into fall-apart tenderness with a sweet-tangy glaze that caramelizes edges into sticky, golden perfection. The secret lies in slow-cooking the ribs until they're fork-tender, then basting them with homemade apple butter that blends smoky depth with fruit-forward sweetness.
After perfecting this over countless backyard cookouts, I can confidently say these ribs deliver restaurant-quality results without requiring a professional smoker.
The process begins with a dry rub of brown sugar, smoked paprika, and chili powder that creates a flavorful bark while the ribs cook low and slow—typically 5 to 6 hours at 225°F. Meanwhile, the apple butter glaze simmers down into a thick, aromatic sauce that clings to every rib, balancing the smoky heat with natural apple sweetness and warm spices.
What makes this recipe truly special is how the glaze doesn't just sit on top—it penetrates the meat during the final basting stage, infusing each bite with complex flavor.
By the time you're ready to serve, you'll have ribs that are tender enough to pull apart with minimal effort, their edges glistening with caramelized apple butter. The aroma alone will have everyone gathering around the table, and each bite delivers a perfect harmony of smoky, spicy, and sweet.
These ribs work equally well on a grill, in the oven, or even in a slow cooker, making them versatile enough for any occasion.
Pair them with classic sides like tangy coleslaw or buttery cornbread to complete the meal. The key to success is patience—the slow cooking ensures melt-in-your-mouth texture, while the apple butter glaze elevates ordinary ribs into something truly memorable.
Let's get started on creating ribs that will have your guests asking for seconds.
Ingredients for apple butter ribs
Six ingredients for the ribs, seven for the glaze—simple enough for weeknight cooking, bold enough for company.
| Ingredient | Amount | Notes |
|---|---|---|
| Pork Baby Back Ribs 🍖 | 4 lb | Bone-in, meaty ends preferred |
| Brown Sugar 🍚 | ½ cup | Packed, light or dark |
| Smoked Paprika 🌶️ | 2 tbsp | For deep smoky flavor |
| Ground Chili Powder 🌶️ | 1 tbsp | Mild or medium heat |
| Kosher Salt 🧂 | 1 tbsp | Diamond Crystal preferred |
| Black Pepper 🌶️ | 1 tsp | Freshly ground preferred |
| Apple Butter 🍎 | 1 ½ cups | Homemade or quality store-bought |
| Cider Vinegar 🍶 | ¼ cup | For tangy balance |
| Yellow Onion 🧅 | 1 whole | Diced for apple butter |
| Garlic Cloves 🧄 | 4 cloves | Minced for apple butter |
| Cinnamon Stick 🌿 | 1 whole | For apple butter depth |
| Unsalted Butter 🧈 | 2 tbsp | Full-fat for richness |
| Apple Cider 🍎 | ½ cup | For apple butter base |
| Fresh Cilantro 🌿 | ¼ cup | Chopped, for garnish (optional) |
The ribs need to be meaty and full of flavor, so bone-in baby backs with meaty ends are key. I grab mine from Costco when I'm doing a big batch, but most grocery stores carry them too. Look for good marbling—those white streaks of fat mean juicier ribs. The apple butter? Homemade is ideal—it's where the magic happens—but Mott's or Smucker's work in a pinch. Don't skimp on the brown sugar either; it's what caramelizes into that sticky, golden bark you're after.
No smoked paprika? Regular paprika plus a pinch of liquid smoke gets you close. Want more heat? Add a dash of cayenne. The apple butter glaze can be made ahead—I usually prep it the night before so it's ready to baste. Short on cider vinegar? Apple juice with a splash of lemon juice works too. The cinnamon stick is non-negotiable though—it adds that warm, spiced depth that makes this glaze special. And if you're feeling fancy, add a pinch of star anise to the glaze for extra complexity.
The ribs keep beautifully in the fridge for 3-4 days if you wrap them tightly in foil. The apple butter glaze? It lasts up to 2 weeks in the fridge—great for making extra. I always portion the ribs into individual foil packets before freezing so they're ready to pull straight from the freezer. Thaw overnight in the fridge, then finish on the grill or in the oven. And trust me, leftovers are even better the next day—the flavors meld even more.
Why You'll Love This Recipe
- Sweet-Savory Magic: The brown sugar and apple butter blend turns these ribs into something ridiculously good—caramelized edges with just enough heat from the chili powder to keep it interesting. Honestly, the first time I bit into one, I nearly dropped the fork.
- One-Pan Wonder: Not the prettiest setup, but the taste makes up for it. You’re basically rubbing ribs with a sticky, smoky-sweet mix, then baking them—no smoker, no fancy equipment. My daughter even helps slather on the apple butter (she’s weirdly proud of it).
- Leftovers for Days: These ribs taste even better the next day, and they’re perfect for sandwiches or tacos. I’ll be real: I’ve reheated them three times and still crave them. The chili powder keeps the heat balanced, so they don’t dry out.
- Budget Crowd-Pleaser: A full rack feeds six for under $20, and the ingredients are all pantry staples. Smoked paprika and brown sugar do the heavy lifting—no fancy rubs needed. My book club voted these the best potluck dish ever.
Step-by-step instructions for apple butter ribs
Here's how to create ribs with a perfect balance of sweet apple butter caramel and smoky-spiced depth.
Prepare the Dry Rub for Maximum Flavor
In a medium bowl, combine the 0.5 cup brown sugar, 2 tablespoons smoked paprika, 1 tablespoon ground chili powder, 1 tablespoon kosher salt, and 1 teaspoon black pepper. Mix thoroughly with your hands or a whisk until the sugar crystals are evenly distributed throughout the spices. This dry rub is the foundation of your ribs' flavor profile—don't skip the mixing.
Pat the 4 lb pork baby back ribs dry with paper towels, removing any excess moisture from the meat. This step is crucial because moisture prevents the rub from sticking properly and can lead to uneven cooking. Once dry, generously coat both sides of the ribs with the dry rub, pressing it firmly into the meat so it adheres well. Place the ribs on a wire rack set over a baking sheet to allow air circulation on all sides.
Create the Apple Butter Sauce Base
In a separate bowl, combine the 1.5 cups apple butter, 0.25 cup cider vinegar, 0.5 cup apple cider, and the 1 whole cinnamon stick. Stir well to blend all ingredients thoroughly. The vinegar and cider will help tenderize the ribs while adding a tangy contrast to the sweet apple butter. If your apple butter is particularly thick, you can gently warm it in a small saucepan over low heat for 2-3 minutes to make it easier to spread.
Finely dice the 1 whole yellow onion and mince the 4 cloves garlic. Add these to the apple butter mixture and stir again. The onions and garlic will infuse additional depth into the sauce, creating a complex flavor that complements the ribs beautifully. Keep this sauce mixture ready—it will be used later to baste the ribs during cooking.
Slow-Cook the Ribs with Apple Butter Basting
Preheat your oven to 275°F. Place the ribs on a foil-lined baking sheet, meaty-side up. Bake for 2 hours to begin the cooking process. After 2 hours, remove the ribs from the oven and brush both sides generously with the apple butter sauce. Return the ribs to the oven and continue baking for another 2 hours. This slow cooking method allows the meat to become tender while the sauce caramelizes and forms a glossy glaze.
During the last 30 minutes of cooking, increase the oven temperature to 325°F. This final boost helps the sauce thicken and develop a deeper caramel color. The ribs are done when they easily pull away from the bones and the internal temperature reaches 195-203°F in the thickest part of the meat. If the sauce starts to dry out, brush on additional apple butter sauce to maintain moisture and flavor.
Finish with Butter and Garnish
Once the ribs are fully cooked, remove them from the oven and transfer to a cutting board. Let them rest for 10-15 minutes before serving. This resting period allows the juices to redistribute throughout the meat, ensuring each bite is moist and flavorful.
While the ribs rest, melt the 2 tablespoons unsalted butter in a small saucepan over low heat. Once melted, brush this butter generously over the top of the ribs. The butter adds a rich, velvety finish that complements the sweet and smoky flavors. Finally, garnish with the 0.25 cup chopped fresh cilantro for a bright, fresh contrast. Serve the ribs with extra apple butter sauce on the side for dipping or drizzling over each portion.
Pro Tips For Making Apple Butter Ribs
- Trim the Fat First: Baby back ribs have a thin fat cap—leave it on for flavor, but slice through it with kitchen shears before seasoning. This lets the apple butter sauce cling better and prevents soggy spots where the fat would render unevenly.
- Brown Sugar Early: Mix the brown sugar into the apple butter before applying it to the ribs. Cold sugar on hot meat can burn before the sauce melts, turning your glaze into a sticky mess instead of a caramelized crust.
- Skip the Crowding: If you’re smoking or baking, give those ribs space. Stacking them traps steam, turning the chili powder into a sad, damp paste instead of a crisp, smoky crust. Leave a thumb’s width between racks.
- Sauce in Layers: Don’t drown them—brush on a thin coat of apple butter first, then sprinkle smoked paprika and chili powder. Add another layer of sauce only after the first one’s sticky enough to hold. This builds flavor without turning your ribs into a syrup-soaked log.
Pro cooking tips for this dish
Temperature Control Secrets
Your oven's temperature gauge can be off by 25°F or more, so I use an infrared thermometer to verify it's actually at 275°F before starting. During the first 2 hours of cooking, maintain this steady temperature—fluctuations cause uneven cooking.
For the final 30 minutes, bump it to 325°F to caramelize the apple butter glaze without overcooking the meat. 🌡️
Dry Rub Adherence
Pressing the dry rub into the ribs isn't just about flavor—it creates a protective bark that locks in moisture during cooking. Use a light touch with your fingers to work the spices into the crevices, especially around the bone edges.
If your ribs are particularly oily, pat them dry with paper towels first to help the rub stick better. This step makes all the difference in preventing dry meat.
Apple Butter Glaze Timing
Baste the ribs with the apple butter sauce only after 2 hours of cooking—this ensures the meat has developed enough collagen to absorb the glaze properly. I use a pastry brush for even coverage, focusing on the meaty sides.
For extra richness, add 1 tablespoon of apple cider to the glaze during the final basting to help it cling better. 🍎
Resting for Juiciness
Never skip the 10-15 minute rest after removing ribs from the oven. This allows the juices to redistribute, preventing them from pooling out when you cut. I place the ribs on a wire rack over a baking sheet to catch any drippings, then tent loosely with foil.
The first bite after resting? That's when you'll taste the true magic of the apple butter infusion.
Butter Finish Technique
Melt the 2 tablespoons unsalted butter until it's just warm (not hot) to preserve its flavor. Brush it over the ribs in the last 2 minutes of resting time—this creates a glossy, velvety finish that elevates the dish.
For an extra touch, sprinkle a pinch of flaky sea salt right before serving to balance the sweetness.
Equipment Upgrades
Invest in a meat thermometer with a probe—I use the ThermoWorks Smoke—to monitor internal temperature accurately. A wire rack on your baking sheet improves air circulation, while a pastry brush ensures even glaze application. These small tools make a big difference in professional-quality results at home. 💡
Nutrition facts
Frequently asked questions
Can I use store-bought apple butter instead of making my own?
Quality store-bought apple butter works perfectly—brands like Mott's or Smucker's add sweetness and depth without requiring extra prep. For best results, choose one with minimal additives and at least 3 ingredients (just apples, sugar, and cinnamon). If it's too thick, warm it gently with 1 tablespoon apple cider to loosen before basting.
What if my ribs aren't tender enough after 4 hours?
Keep them going! Ribs need to reach 195-203°F internally. If they're not there after 4 hours at 275°F, wrap them tightly in foil with a splash of apple cider and return to the oven for another 1-2 hours. The foil creates a steam bath that breaks down collagen faster. Don't rush—patience is key for fork-tender meat.
Can I make these ribs in a slow cooker?
Yes, but with adjustments. Place the dry-rubbed ribs in the slow cooker on low for 6-7 hours, adding 1 cup apple cider to the bottom. After 4 hours, brush with apple butter glaze and cook 2 more hours. The low heat ensures tenderness, but you may need extra glaze since slow cookers dry out faster.
How do I prevent the apple butter glaze from burning?
Baste the ribs only after 2 hours of cooking when the meat is hot enough to caramelize the glaze safely. Use a pastry brush for even coverage and avoid piling glaze in one spot. For extra insurance, keep the oven at 325°F during the final 30 minutes—this creates a glossy finish without burning.
What sides pair best with apple butter ribs?
Classic choices include creamy coleslaw (the tang cuts the sweetness) and buttery cornbread for soaking up sauce. For a lighter option, try roasted sweet potatoes with a sprinkle of cinnamon or a crisp apple salad with red onion and arugula. The key is balancing textures—something crunchy or creamy complements the ribs perfectly.